BASIC IP MIGRATE GUIDE
Application Scenario
As of September 30, 2025, the Basic SKU for Public IP addresses has been deprecated. If you are still using Public IPs with the Basic SKU, please upgrade to the Standard SKU as soon as possible.
To support and assist you with this upgrade, Azure Support has published a series of articles that provide detailed step-by-step guidance for upgrading five related Azure resources and features. We hope these resources will offer valuable support for your upcoming upgrade or migration efforts.
| Resource Type | Upgrade Procedure Description |
|---|---|
| VPN Gateway | Upgrade Basic IP of VPN Gateway |
| ExpressRoute Gateway | Upgrade of the Basic IP of ExpressRoute Gateway |
| Load Balancer | Upgrade from Basic Load Balancer to Standard Load Balancer |
| Virtual Machine | Upgrade the Basic Public IP of the VM to Standard |
| Virtual Machine Scale Set | Upgrade the public IP of the instances in VMSS Flexible from Basic to Standard |
Upgrade Basic IP of VPN Gateway
Pre-Upgrade Considerations
**Prerequisite:** The Migrate button must be visible in the Portal.
Active-active gateways are expected to be released by March 2026; Active-passive gateways (excluding Legacy VPN Gateways) have been released as of December 2025.
Approximately 10 minutes of downtime is expected.
After upgrade, non-AZ VPN Gateways will be upgraded to AZ VPN Gateways during the IP upgrade. Currently, North2 and East2 support AZ VPN Gateways. The upgraded VPN Gateway will have "AZ" appended to its SKU name.
It is recommended that new VPN Gateways and other related resources be provisioned in alternative regions, as the North and East regions are scheduled for retirement.
The public IP address will remain unchanged after upgrading from Basic to Standard.
The IP prefix mask length of the VPN Gateway Subnet is less than 28.
Basic Public IP for VPN Gateways will be fully retired by the end of June 2026.
https://learn.microsoft.com/en-us/azure/vpn-gateway/whats-new#upcoming-projected-changes
Upgrade Steps
- If the current Gateway Subnet size is /28 or smaller, first expand the subnet size by following:
The mask length of the newly added IP prefix must be less than or equal to 27.
As a VPN Gateway is already deployed in the current Gateway Subnet, it is not possible to directly expand the original IP prefix from /28 to /27, /26, /25, or other larger subnets.
Click Prepare under the Migrate option. Background preparations will begin. If preparation fails, resolve the issues based on the error message and retry.
- Once prepared, click Migrate.
After migration, verify that VPN tunnels and service traffic are restored. If not, execute Abort.
Once tunnels and traffic are confirmed normal, execute Commit to finalize the upgrade.

Common Issues
As no VPN Gateways using Basic Public IP are available for testing, potential errors cannot be anticipated. If issues arise, contact the Azure Networking support team for assistance.
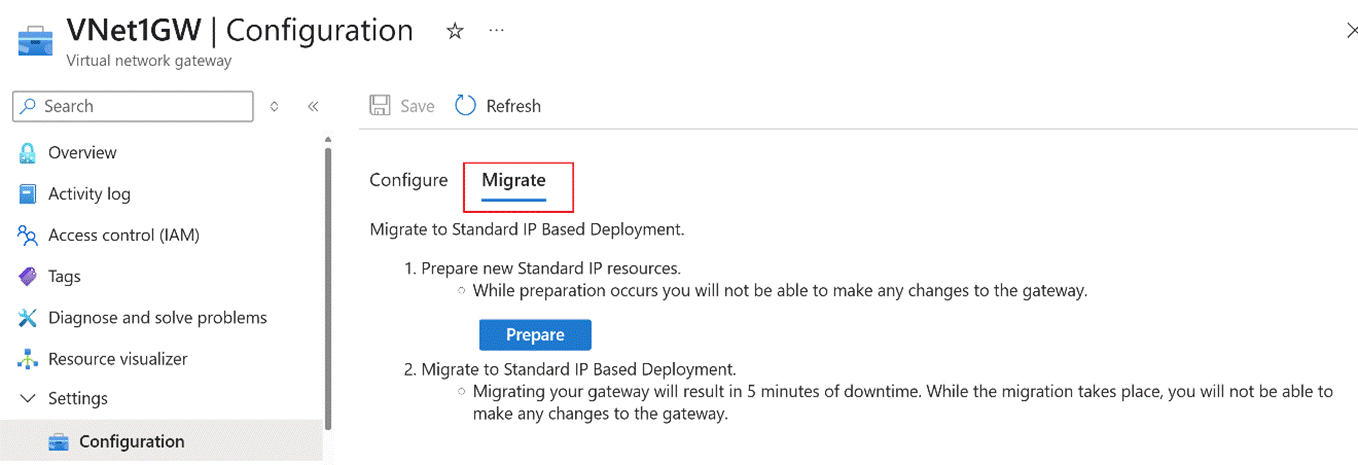
Upgrade of the Basic IP of ExpressRoute Gateway
Overview
The upgrade method for the Basic SKU front-end public of the ExpressRoute Gateway requires using the same tool that is used to migrate the ExpressRoute Gateway’s own SKU. The customer may choose not to change the Gateway’s SKU and simply run through the full migration tool process, which will directly upgrade the public IP from the Basic SKU to the Standard SKU.
Notes
Before performing the migration, we first need to understand some of the limitations.
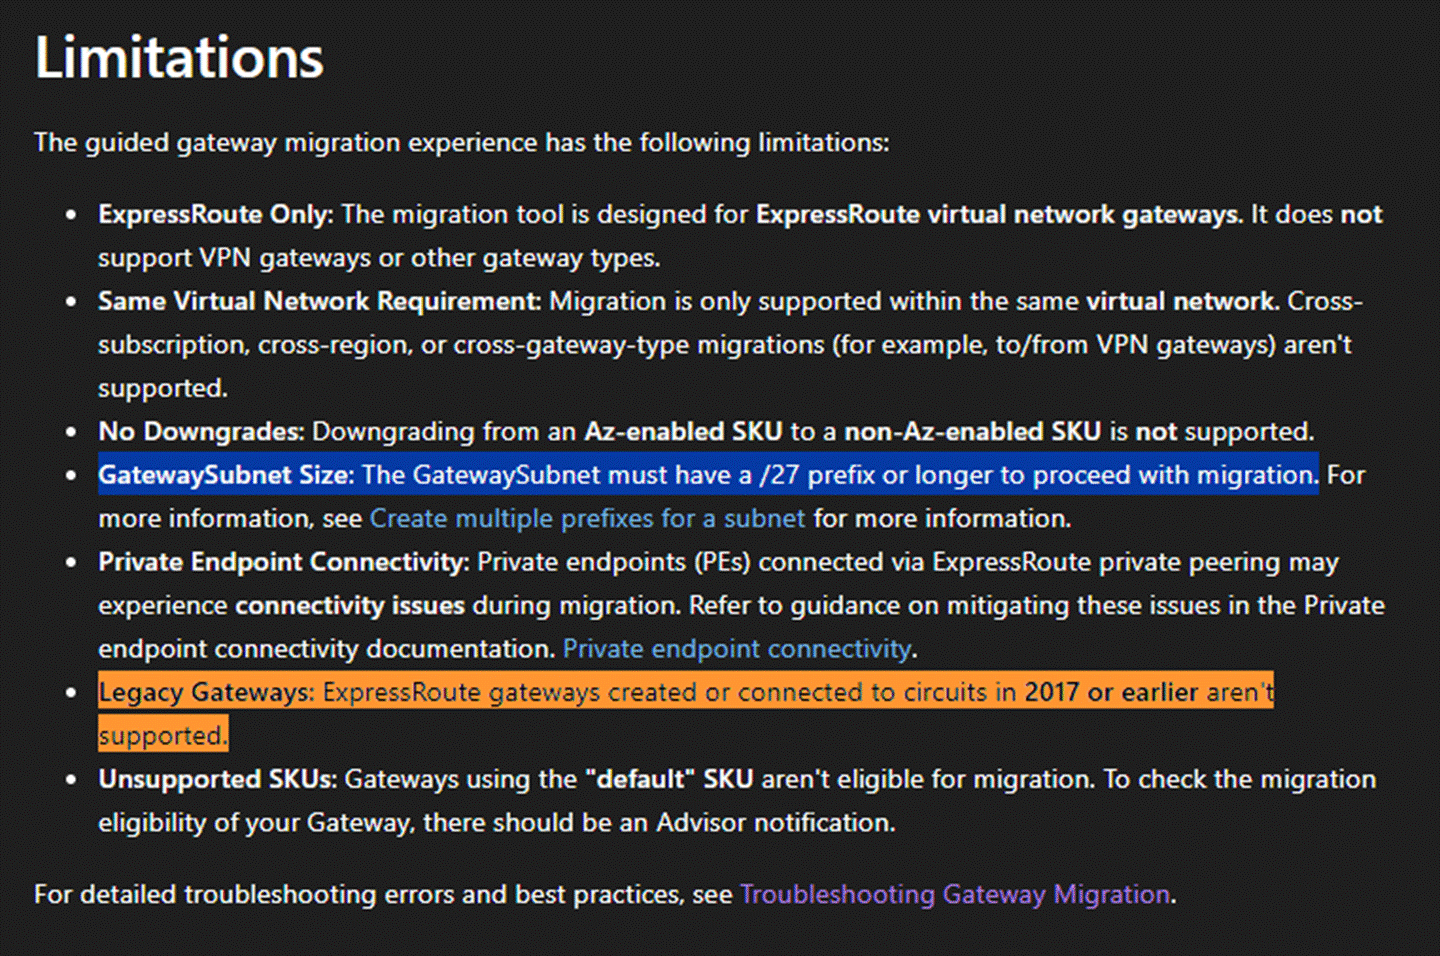
What needs to be emphasized here is, first, the GatewaySubnet must be at least /27 in size. If the customer’s existing GatewaySubnet is smaller than this size, they must first add an additional IP address range to the Virtual Network and then assign an additional subnet range to the GatewaySubnet to ensure that the subnet has enough available IP addresses. Please note that regardless of the original subnet mask size, the size of any newly added subnet must be greater than or equal to /27. For detailed information, please refer to the above document.
In addition, if the customer’s ExpressRoute Gateway was created before 2017, you can discuss with the customer the option of deleting it and recreating a new ExpressRoute Gateway. If you are unsure about the creation time, please raise a support ticket and communicate directly with technical support.
Detailed steps
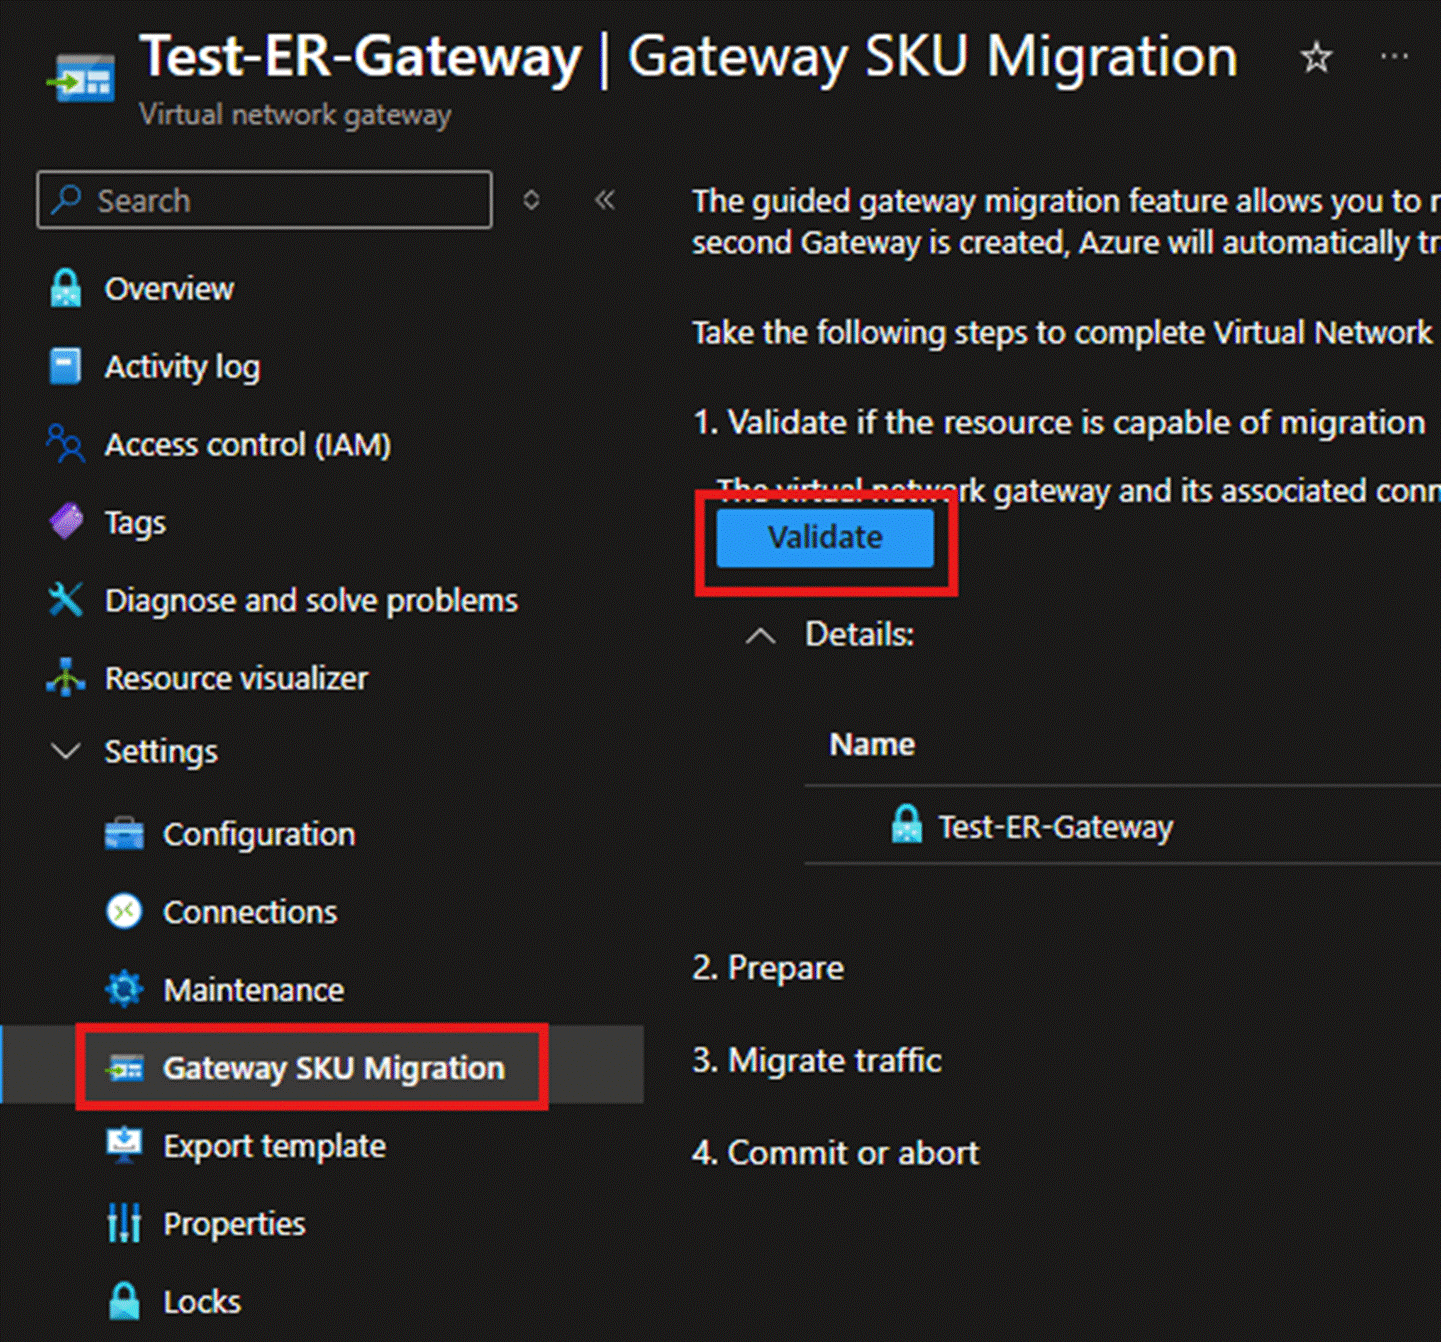
- First, locate the migration tool in the ExpressRoute Gateway menu. Click Validate.
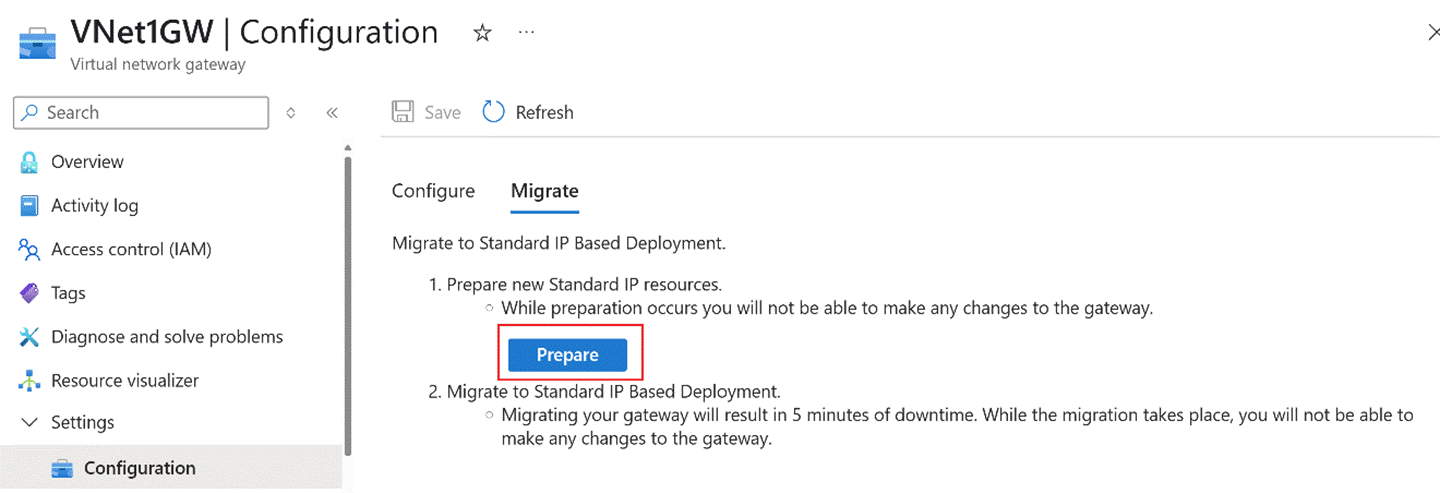
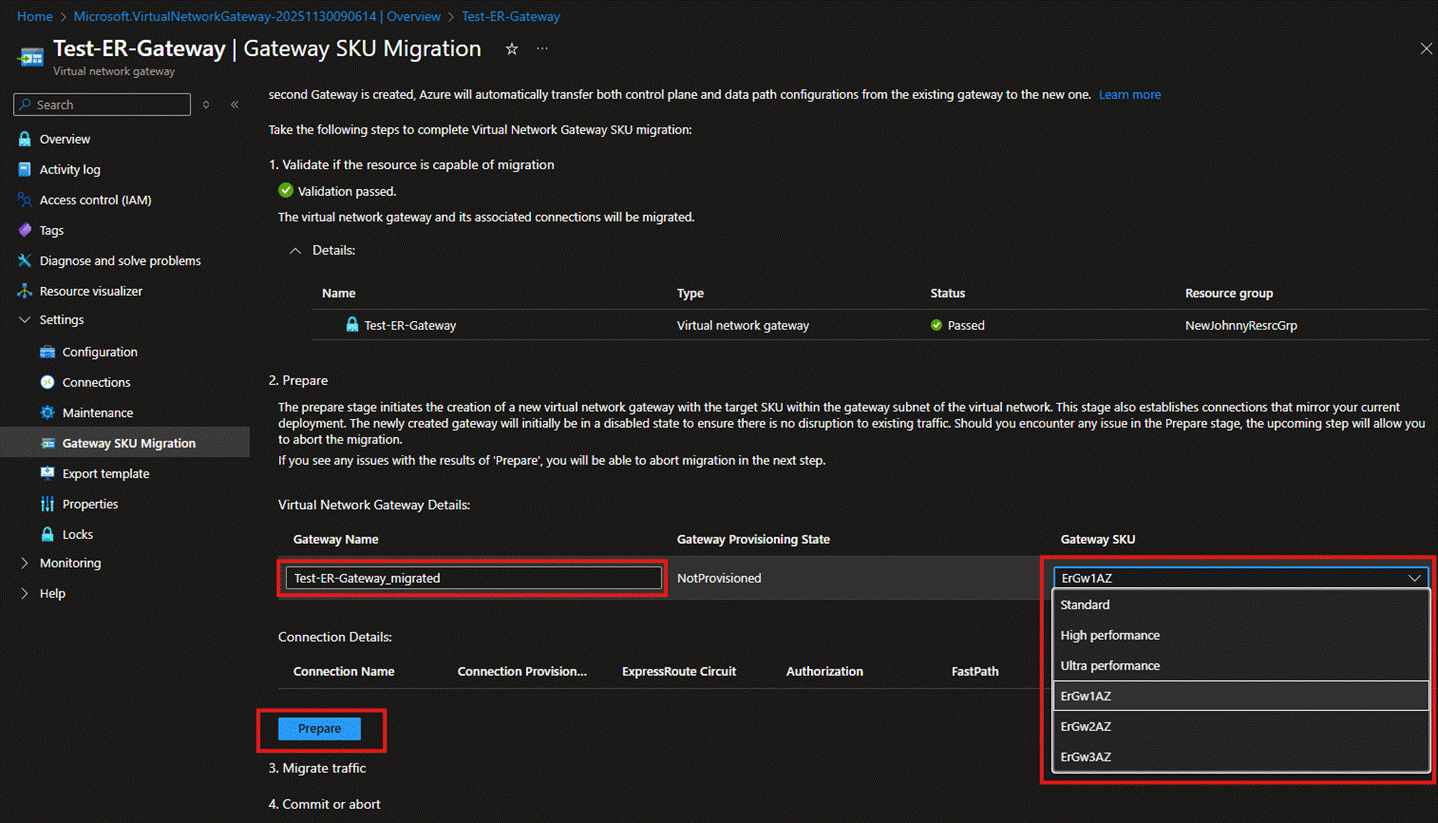
- On the page that appears after successful verification, you can assign a name to the new ExpressRoute Gateway. The SKU on the right will automatically be set to an AZ version, but if the customer does not wish to change it, they can switch it back to the original Standard, High Performance, or Ultra Performance SKU. There is no need to modify the SKU. Click Prepare.
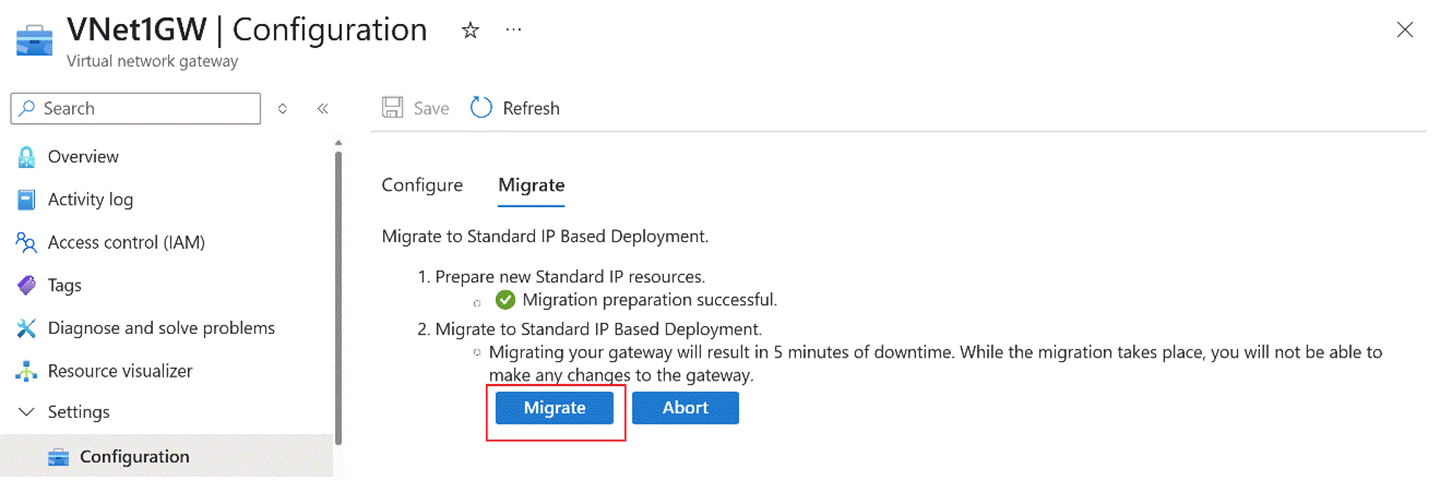
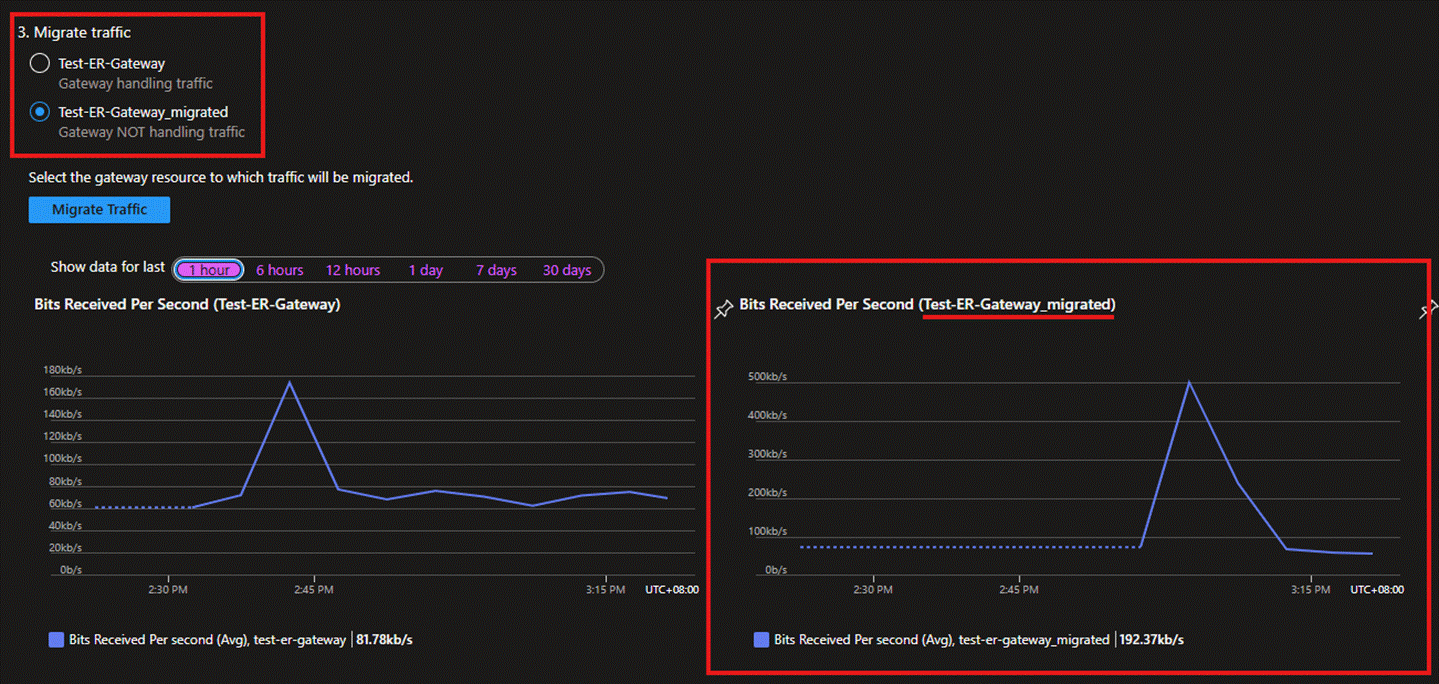
- After waiting a few minutes, you will see that the new ExpressRoute Gateway has been created. At this point, there will be two ExpressRoute Gateways within the same GatewaySubnet. You can then click Migrate to move the connections and traffic to the new ExpressRoute Gateway. During this process, there may be a 3****0-45 minute connection interruption.
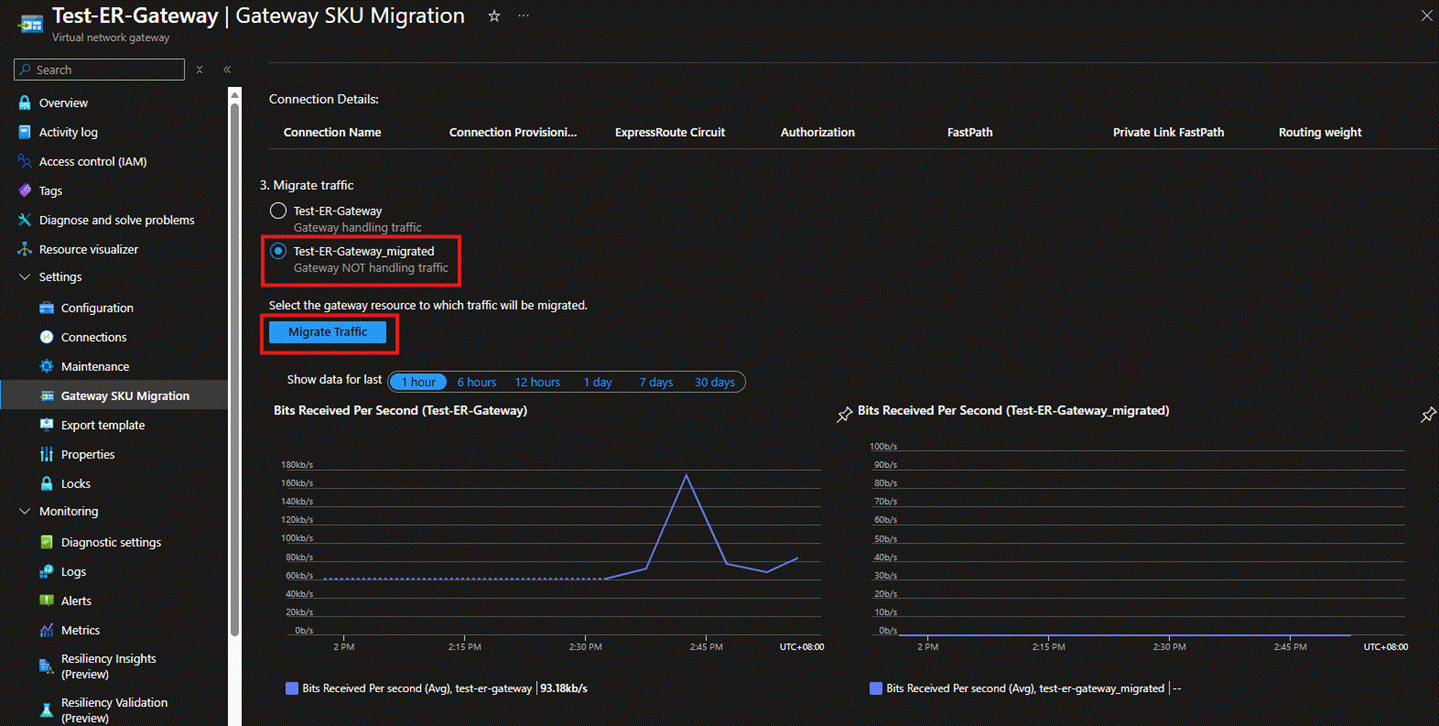
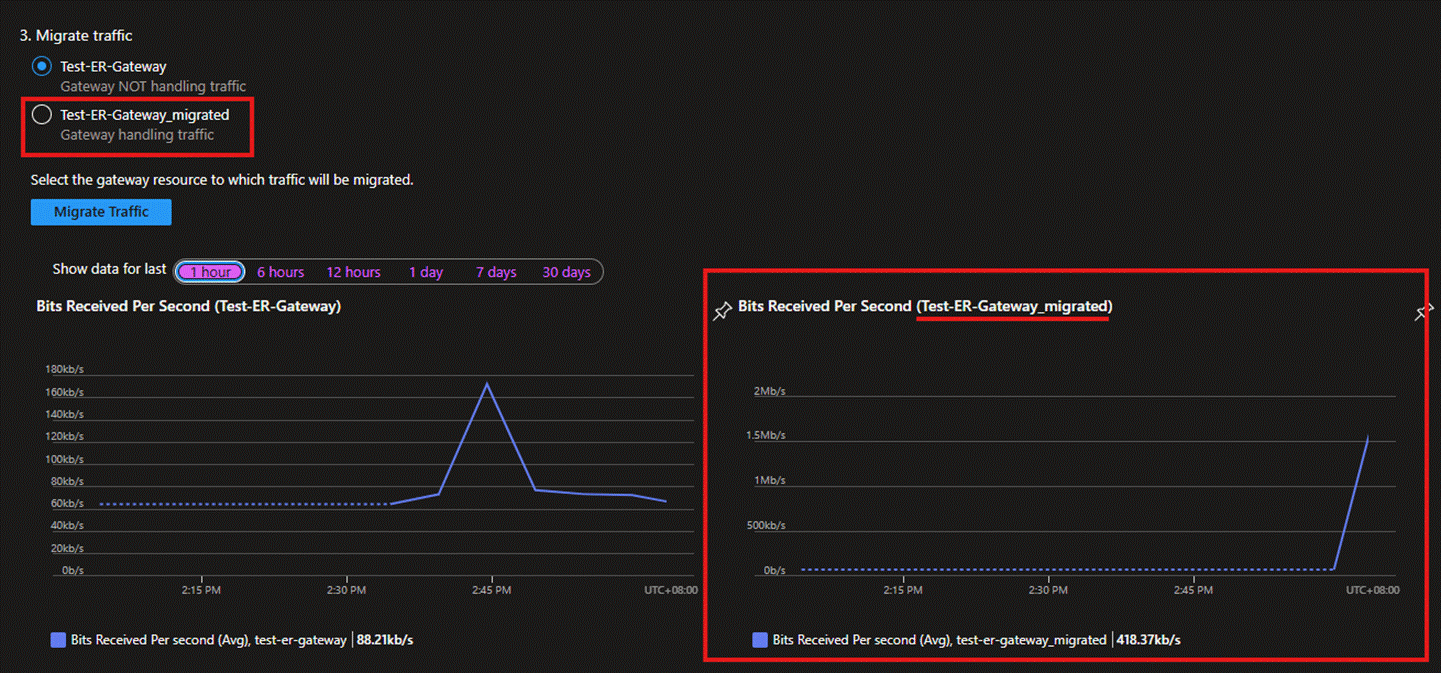
- After completing the above connection migration, under normal circumstances, the page will display that the new ExpressRoute Gateway is already handling traffic. Besides, the chart of the new ExpressRoute Gateway on the lower right-hand side will also show that it has started receiving traffic. It is also recommended that you use devices in your on-premises network to run connectivity tests with the VMs in Azure. For information on the relevant testing tools, please refer to the documentation PsPing - Sysinternals | Microsoft Learn.
Once you have fully confirmed that the communication is normal, continue by clicking the 'Agree' button below to complete the entire migration process.

Steps to Terminate Migration
- If a connectivity test fails during Step 4 above and the migration needs to be terminated, we must repeat Step 3, reselect the old ExpressRoute Gateway, and click "Migrate." After a successful migration, you will notice that the old ExpressRoute Gateway resumes handling traffic.
- At this point, you may click the "Abort" button shown in the screenshot below, and the migration tool will fully revert to the invalidated state. The previously newly created ExpressRoute Gateway will also be deleted.

If further assistance is required, please contact a technical support engineer.
Upgrade from Basic Load Balancer to Standard Load Balancer
Overview
The best practice for upgrading a Basic Load Balancer to a Standard Load Balancer is the script method recommended by the official documentation: Upgrade from Basic to Standard with PowerShell - Azure Load Balancer | Azure Docs
Most users can successfully complete the upgrade using this script. The advantage of this script is that it can retain the frontend public IP of the Basic Load Balancer and the public IPs bound to the network cards of the VMs in the backend pool, while smoothly upgrading these public IPs to the Standard SKU (only Basic public IPs bound to Virtual Machine Scale Sets (VMSS) cannot be retained). All Load Balancer configurations are preserved after the upgrade as well.
Notes
There will definitely be service downtime during the upgrade. Please arrange the time appropriately.
The original Basic Load Balancer will be deleted after the upgrade.
VMs in the backend pool of a Basic Load Balancer can access the internet through the default outbound method, but VMs in the backend pool of a Standard Load Balancer must explicitly specify their outbound method. Some users may not be aware that their VMs are using the default outbound method, so they will find that the VMs in the backend pool cannot access the internet after upgrading the Load Balancer. In this case, refer to the documentation to configure the outbound method for the VMs in the backend pool: Source Network Address Translation (SNAT) for outbound connections - Azure Load Balancer | Azure Docs
Unsupported Scenarios
Basic Load Balancers with IPv6 frontend IP configurations
Basic Load Balancers for Azure Kubernetes Services (AKS) clusters
Basic Load Balancers with a Virtual Machine Scale Set backend pool member where one or more Virtual Machine Scale Set instances have ProtectFromScaleSetActions Instance Protection policies enabled
Migrating a Basic Load Balancer to an existing Standard Load Balancer
Basic Load Balancers with backend pool members that are part of an Availability Set but not all members of the Availability Set are behind the load balancer
If your Basic Load Balancer has floating IP enabled on a secondary IP configuration of the network interface, update the floating IP to a primary IP before running the migration script to avoid any configuration issues
Upgrading with PowerShell Command
- Log in to Azure China:
Connect-AzAccount -Environment AzureChinaCloud
Get-AzSubscription
$context = Get-AzSubscription -SubscriptionId ...
Set-AzContext $context
- Import the Basic Load Balancer upgrade module:
Import-Module AzureBasicLoadBalancerUpgrade
Exit and restart PowerShell.
Verify if the Basic Load Balancer can be upgraded:
Start-AzBasicLoadBalancerUpgrade -ResourceGroupName <loadBalancerRGName> -BasicLoadBalancerName <basicLBName> -ValidateScenarioOnly
Notes
-ValidateScenarioOnly indicates that this is only a validation process and will not actually perform the upgrade.
o If the upgrade is feasible, you will be prompted to continue. After verifying that the parameters are correct, you can select 'y' to perform the actual upgrade process. If you do not want to upgrade temporarily, you can interrupt with Ctrl+C.
o If an error occurs, resolve the relevant issues based on the error message and run this command again for verification. If you are unsure about the next step, contact Azure Technical Support.
- Upgrade the Basic Load Balancer:
Start-AzBasicLoadBalancerUpgrade -ResourceGroupName <loadBalancerRGName> -BasicLoadBalancerName <basicLBName> -StandardLoadBalancerName <newStandardLBName> -FollowLog
Notes
o StandardLoadBalancerName <newStandardLBName> is an optional parameter. If not specified, the name of the new Load Balancer will be the same as the old one.
o -FollowLog is a parameter for printing logs and is optional.
Upgrading on Azure Portal
When the configuration of the basic Load Balancer is very simple, or if the upgrade cannot be completed using a PowerShell script for some reason, you need to manually upgrade the Basic Load Balancer. The process of manually upgrading a Basic Load Balancer is equivalent to rebuilding a Standard Load Balancer. At this point, you need to pay attention to whether to retain the previously used Basic public IPs — if not, the Basic public IPs may be permanently lost. If you confirm that the public IPs need to be retained, you need to understand some relevant features of the public IPs in advance:
The SKU of the Load Balancer must match the SKU of the public IPs on the network cards of the VMs in the backend pool; otherwise, the VMs cannot be added to the backend pool of the Load Balancer.
If a Basic Load Balancer is not participating in actual traffic forwarding and its frontend public IP is dynamically assigned, the platform will reclaim its frontend public IP. The system will only assign an actual public IP after the backend probe is healthy. The same applies to VMs: the platform will reclaim the dynamically assigned Basic public IP when the VM is shut down.
All Standard public IPs are static and will NOT be reclaimed by the platform even when there is no load balancer traffic or when VM is shut down.
If you confirm that you want to manually upgrade the Basic Load Balancer, you can refer to the following steps:
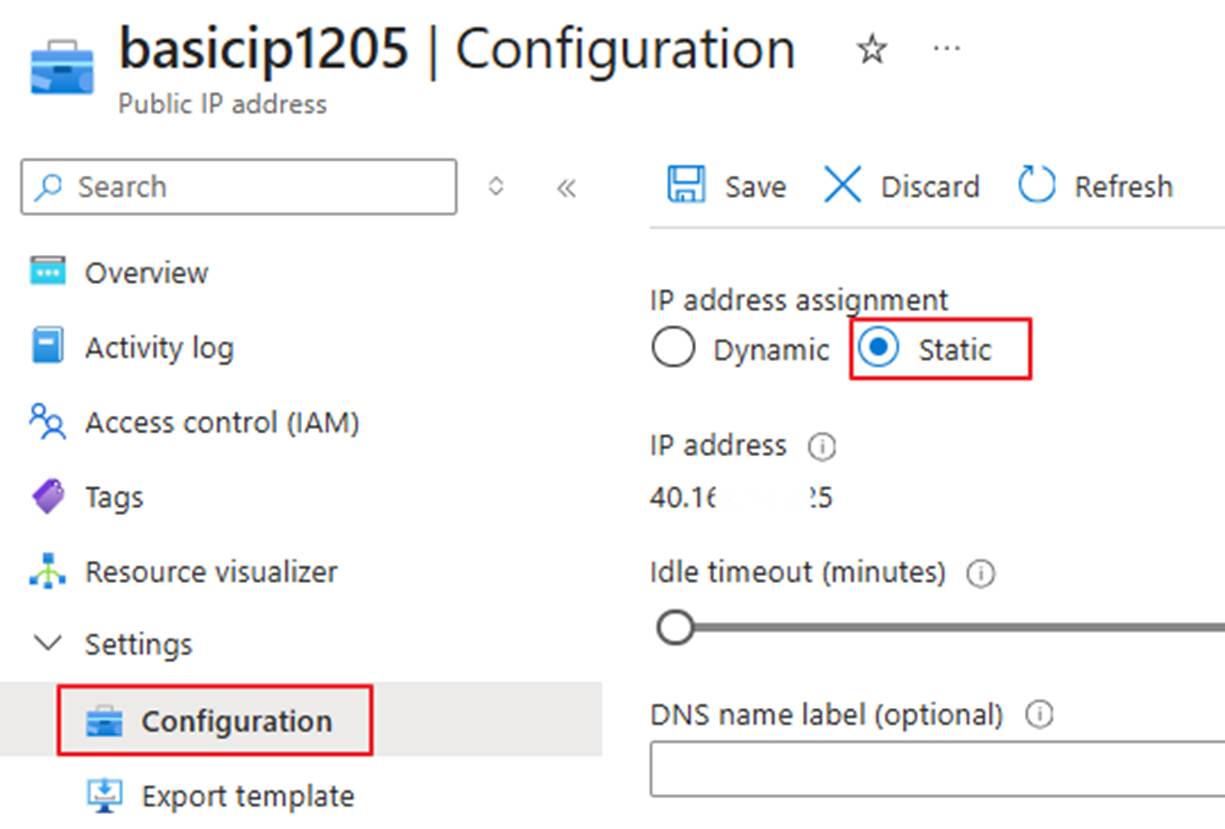
- Switch to the public IP configuration interface and set the public IP to static assignment. If there are multiple front-end public IPs, perform the same operation for all of them.
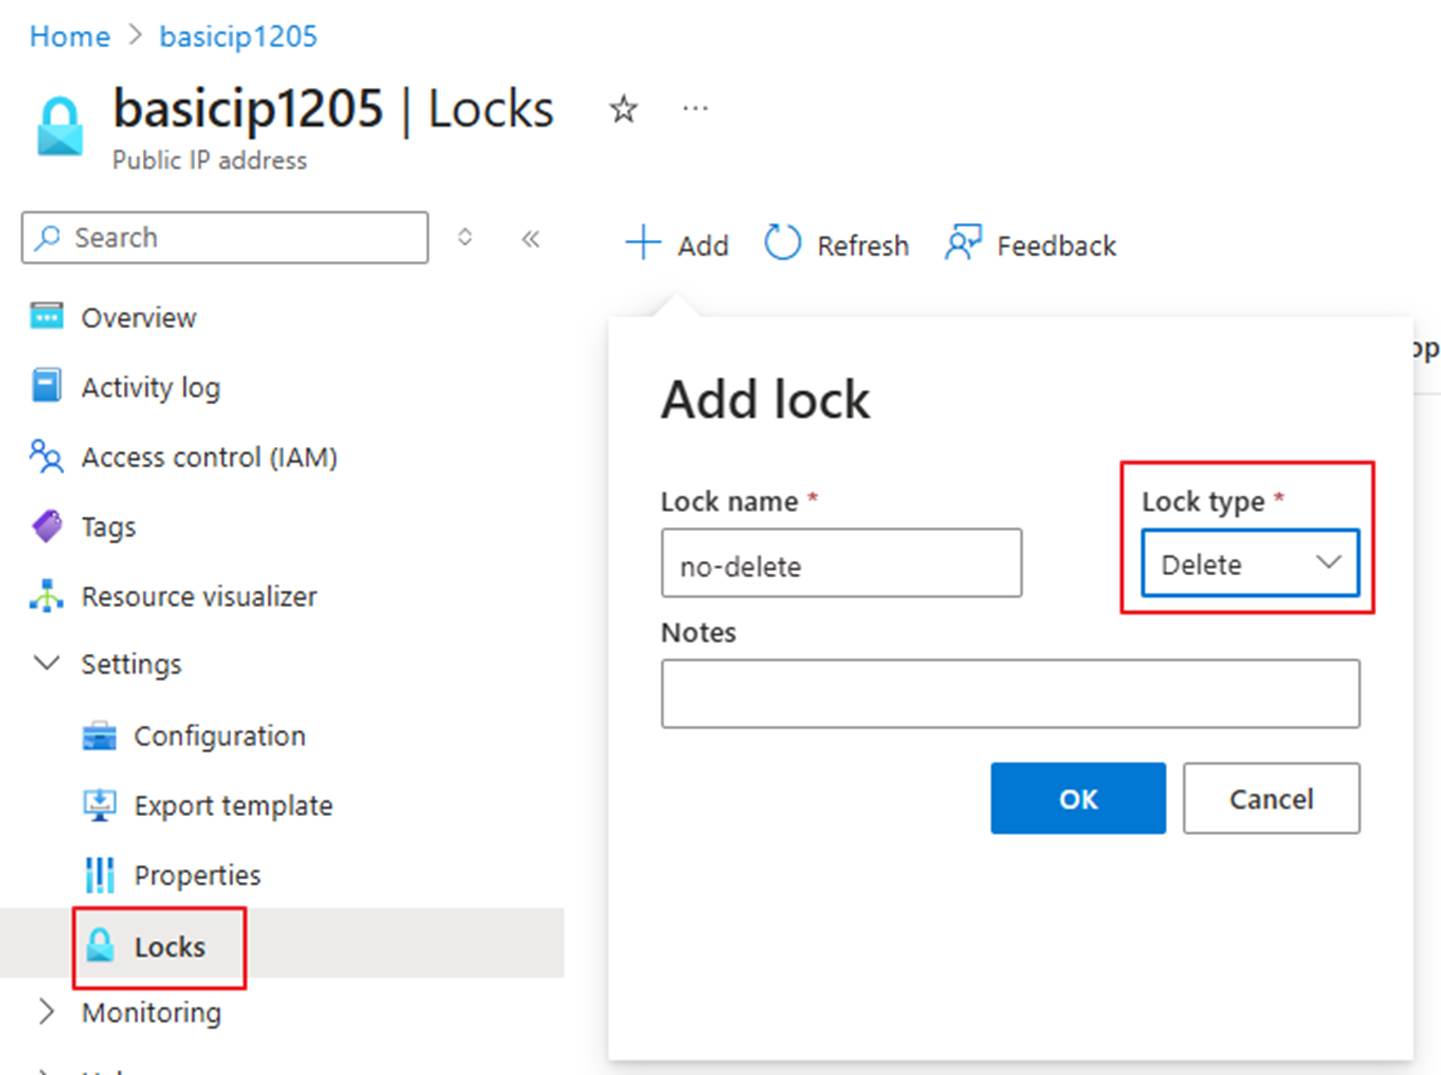
- This step is optional. To prevent accidental deletion of IP resources, you can add a delete lock to the public IP resources.
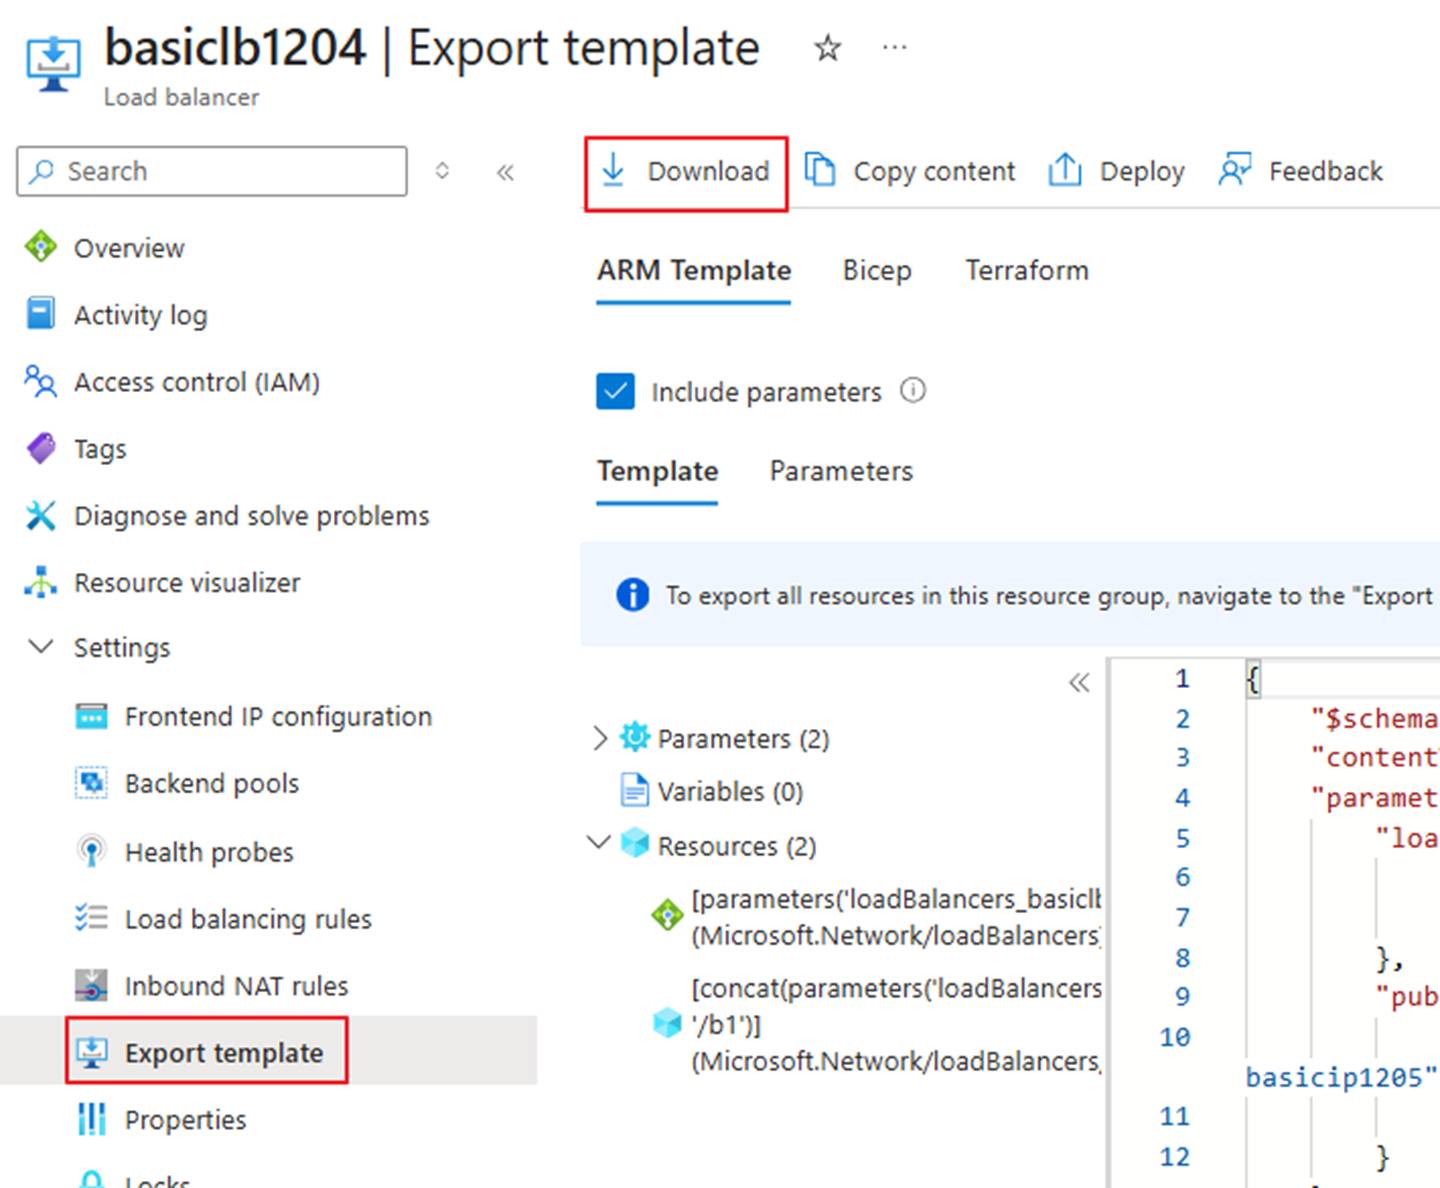
- Back up all current configurations of the Basic Load Balancer using screenshots or by exporting a template, including backend pools, health probes, load balancing rules, etc.
Delete the Basic Load Balancer.
Switch to the public IP interface and upgrade the SKU of all related public IPs.
This step is particularly critical: If the network interfaces of the VMs in the backend pool have public IPs with Basic SKU, you need to refer to the relevant part in this documentation to upgrade them to Standard SKU too. Otherwise, these VMs with basic NIC public Ips cannot be added to the backend pool of the Standard Load Balancer.
Create a new Standard Load Balancer. Note that the front-end IP to be used is the public IP that was previously used by the Basic Load Balancer which has been upgraded from Basic to Standard SKU.
Complete the subsequent configurations based on the screenshots or the template. If you are familiar with template operations, you can also import the template to create the Standard Load Balancer too. For reference: Deploy template - Azure portal - Azure Resource Manager | Azure Docs
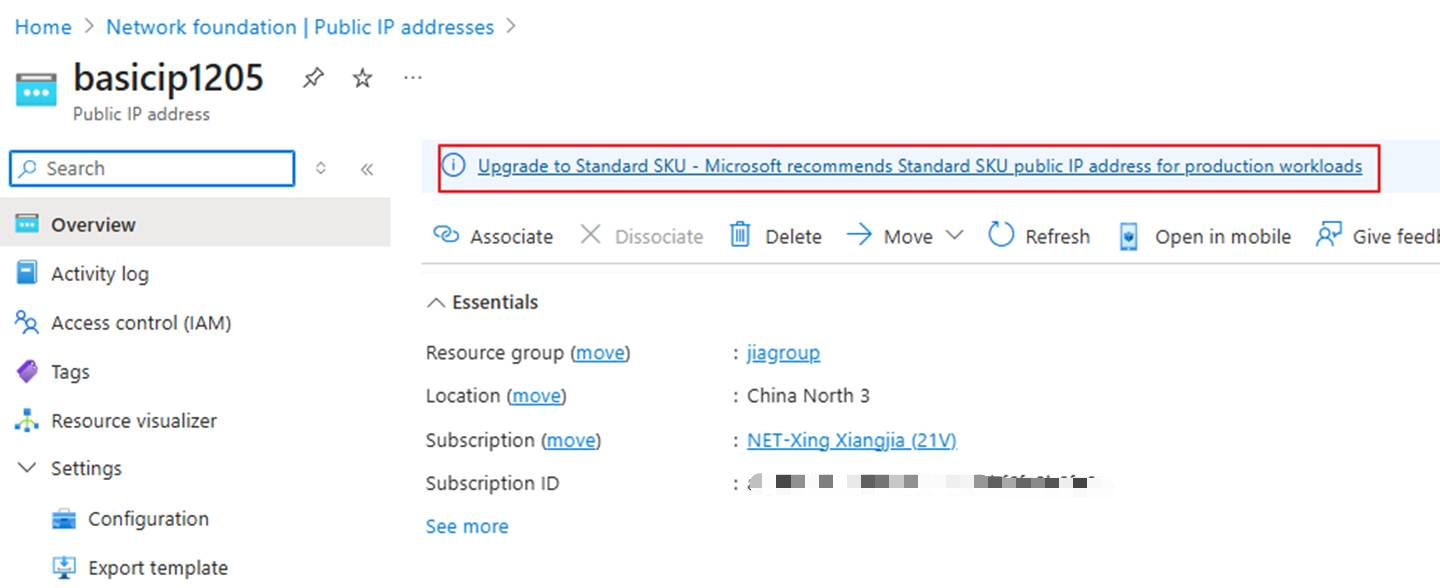
Upgrade the Basic Public IP of the VM to Standard
Precautions Before Upgrade
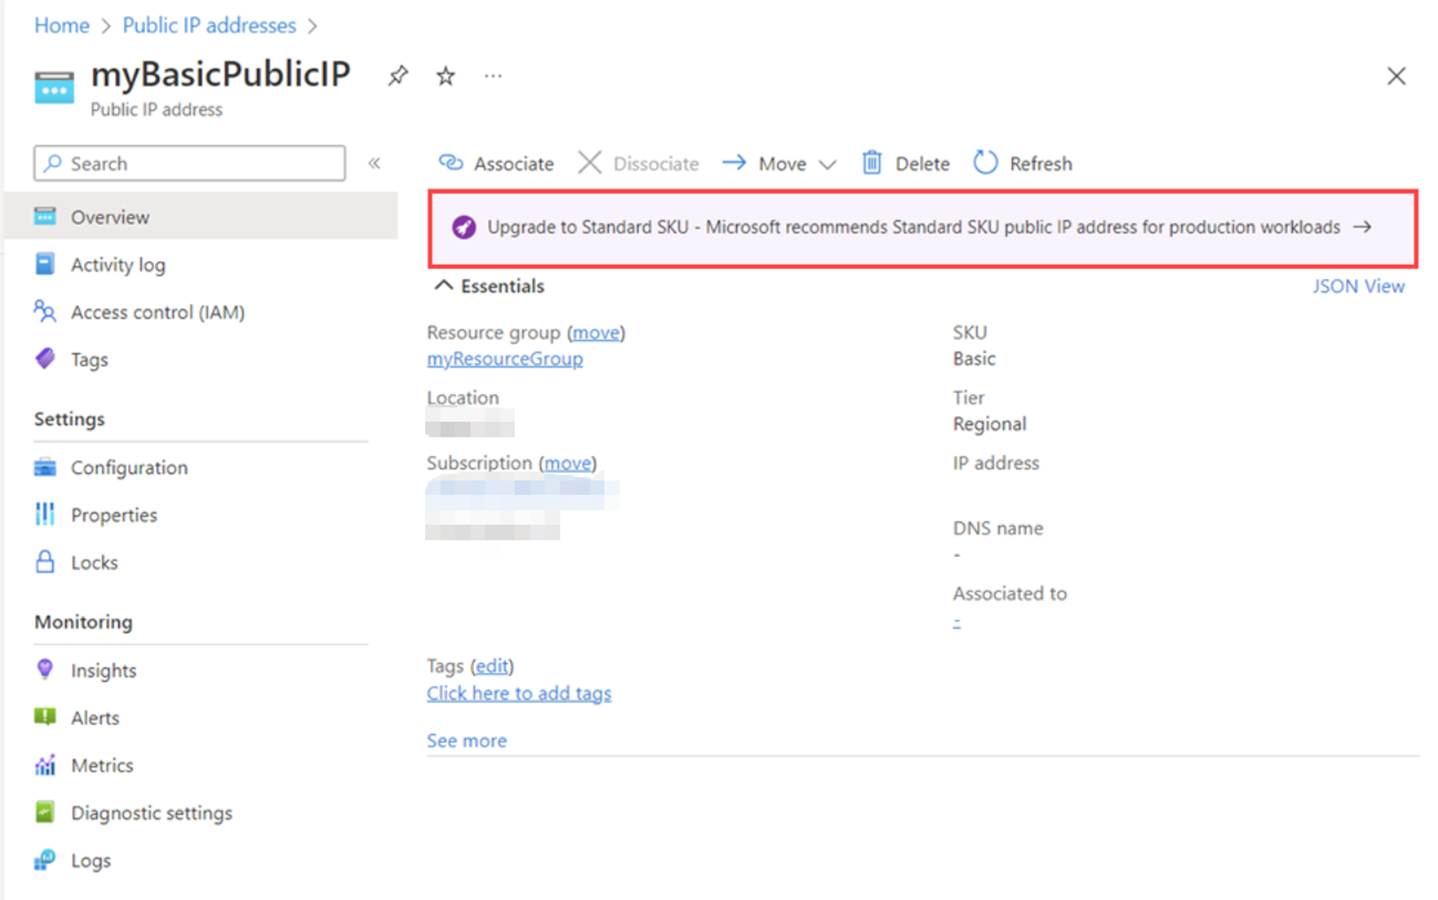
- Verify whether the SKU in the "Overview" section is displayed as "Standard".
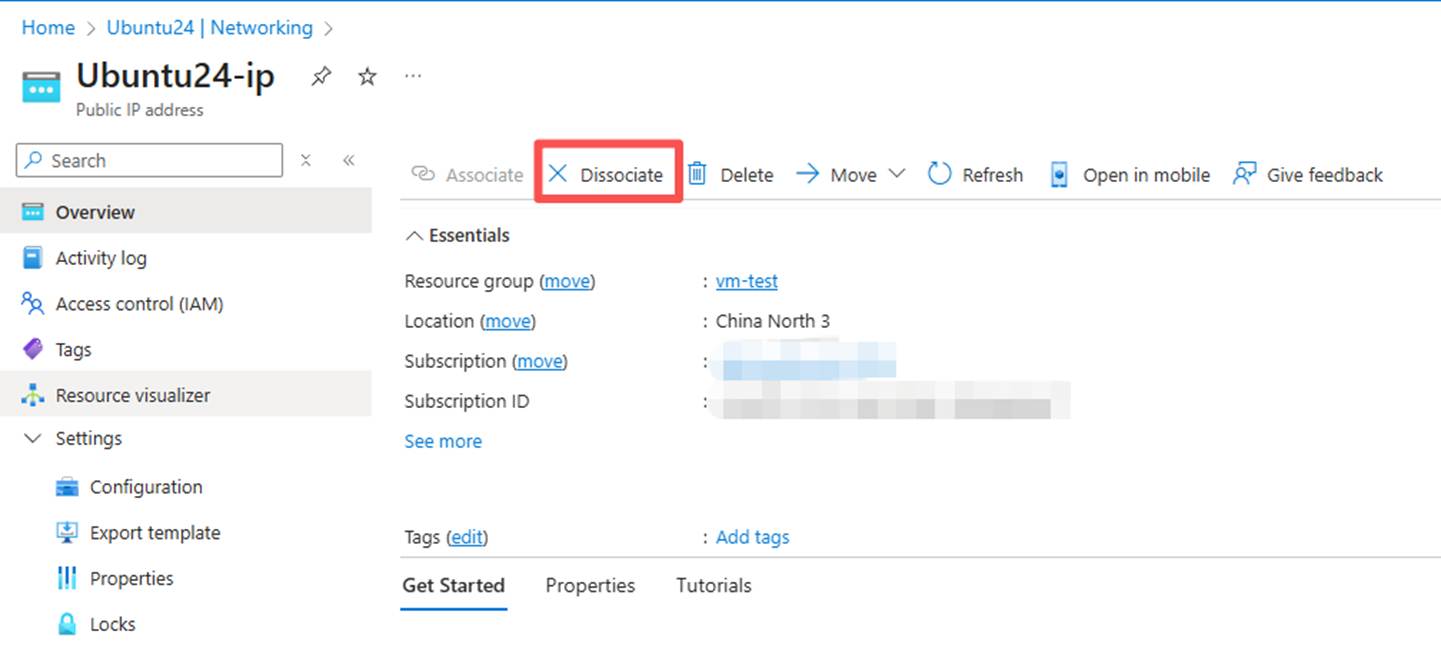
Public IP cannot be associated with any resource,otherwise, it will not be possible to upgrade. For detailed information, please refer to: Create, change, or delete an Azure public IP address - Azure Virtual Network | Azure Docs. Learn how to remove the association of the public IP.
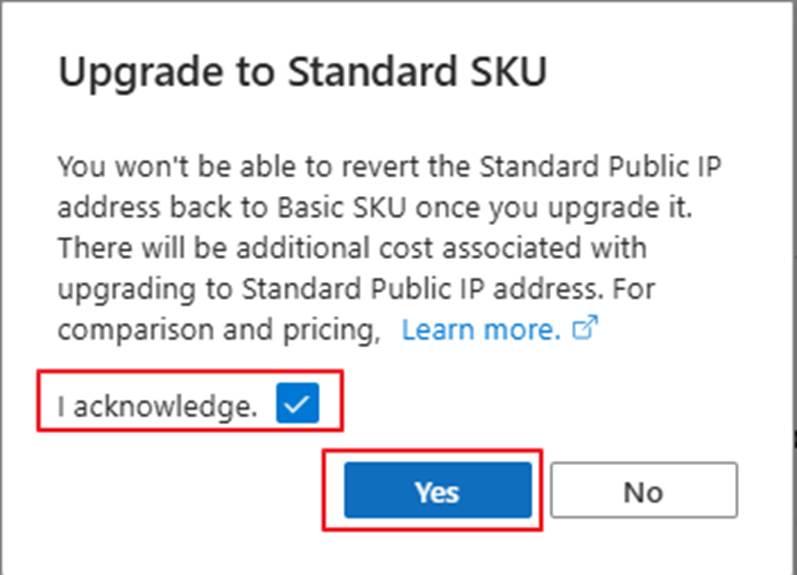
Upgrading a basic public IP to standard SKU can't be reversed.
Upgrade a public IP address | Microsoft Learn

- The standard SKU IP address is deployed using the secure default model.(Public IP addresses in Azure - Azure Virtual Network | Azure Docs)
By default, when the IP address is used as the front end, it will block all internal traffic. To allow traffic and prevent accidental downtime, apply the Network Security Group (NSG)【Azure network security groups overview | Azure Docs】 to the associated network interface (NIC) or subnet of the public IP address.
- In most cases, the public IP associated with the upgrade from the basic SKU to the standard SKU still does not have an availability zone(What are Azure availability zones? | Azure Docs). This means that they cannot be associated with Azure resources that are region-redundant or with the specific region specified in the region where the area is provided. (In very rare cases, the basic public IP is assigned to a specific region and this region will be retained when upgrading to Standard.)
Upgrade operation steps
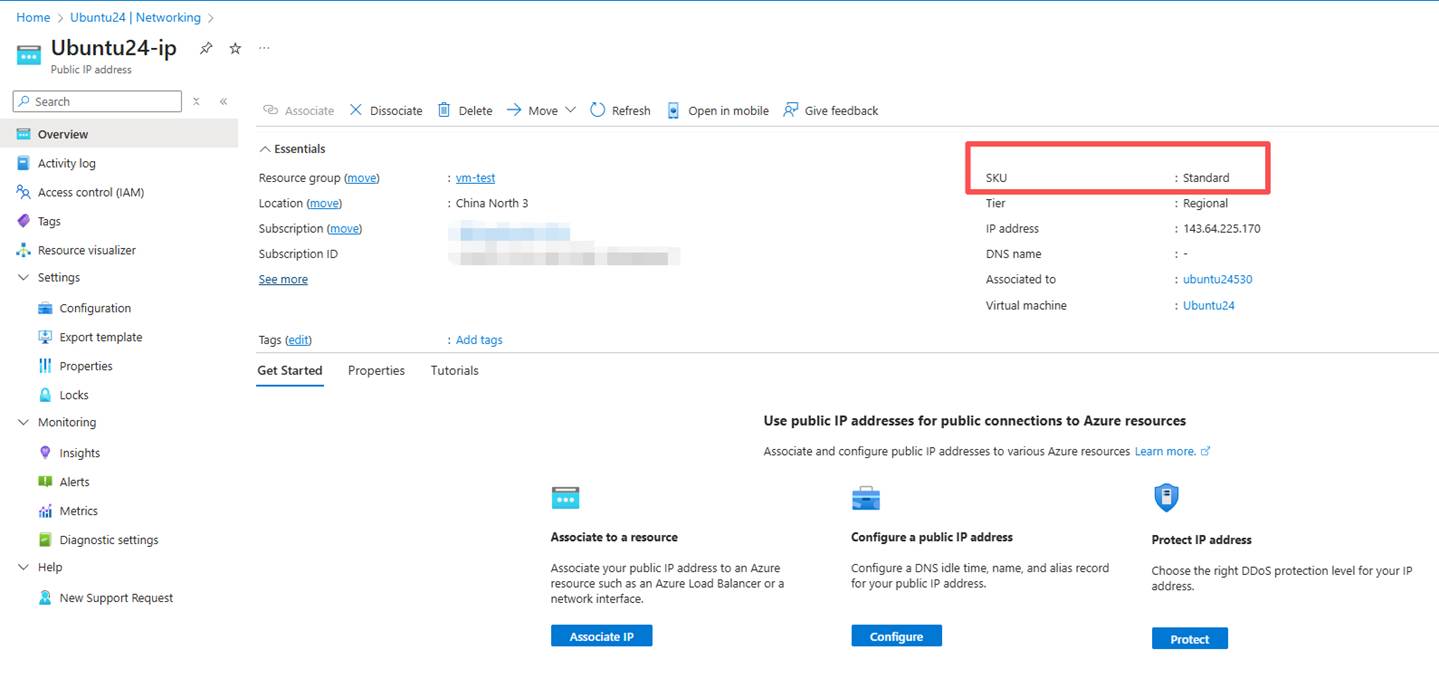
1. The public IP of VM has been upgraded. First, it has been set to a static IP, and the IP will remain unchanged.
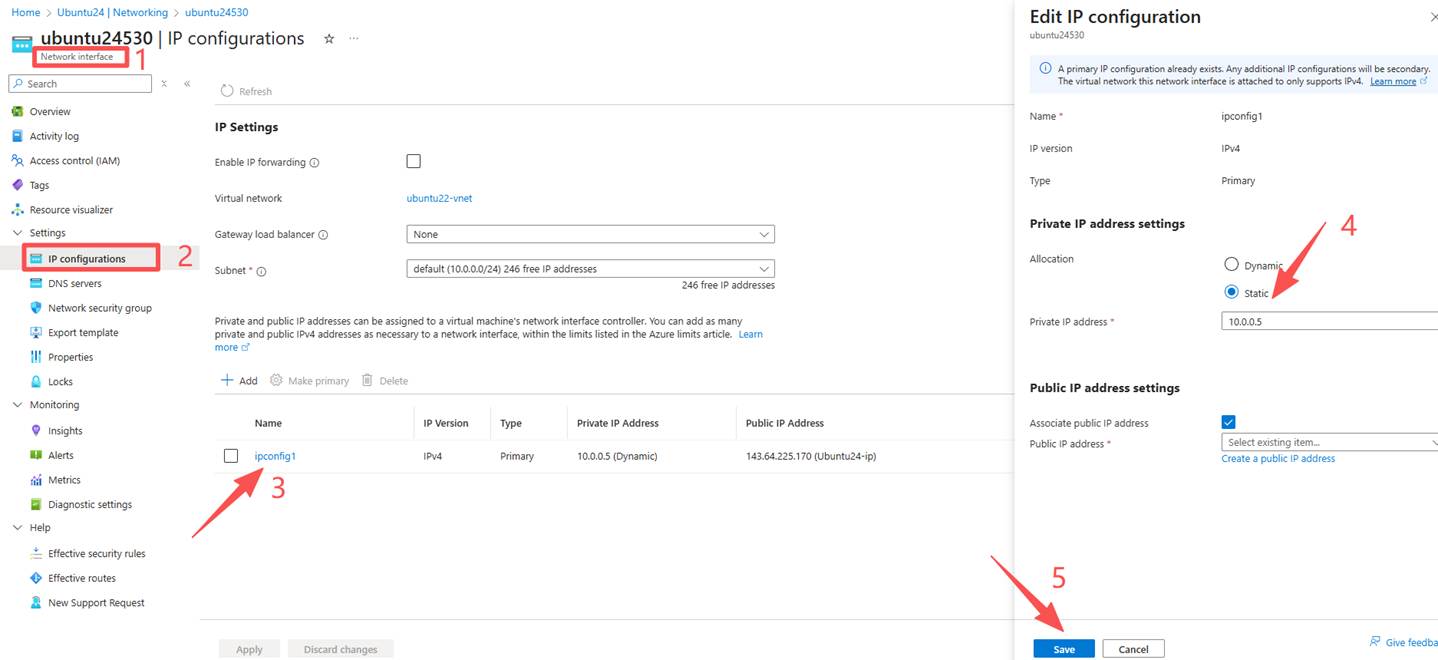
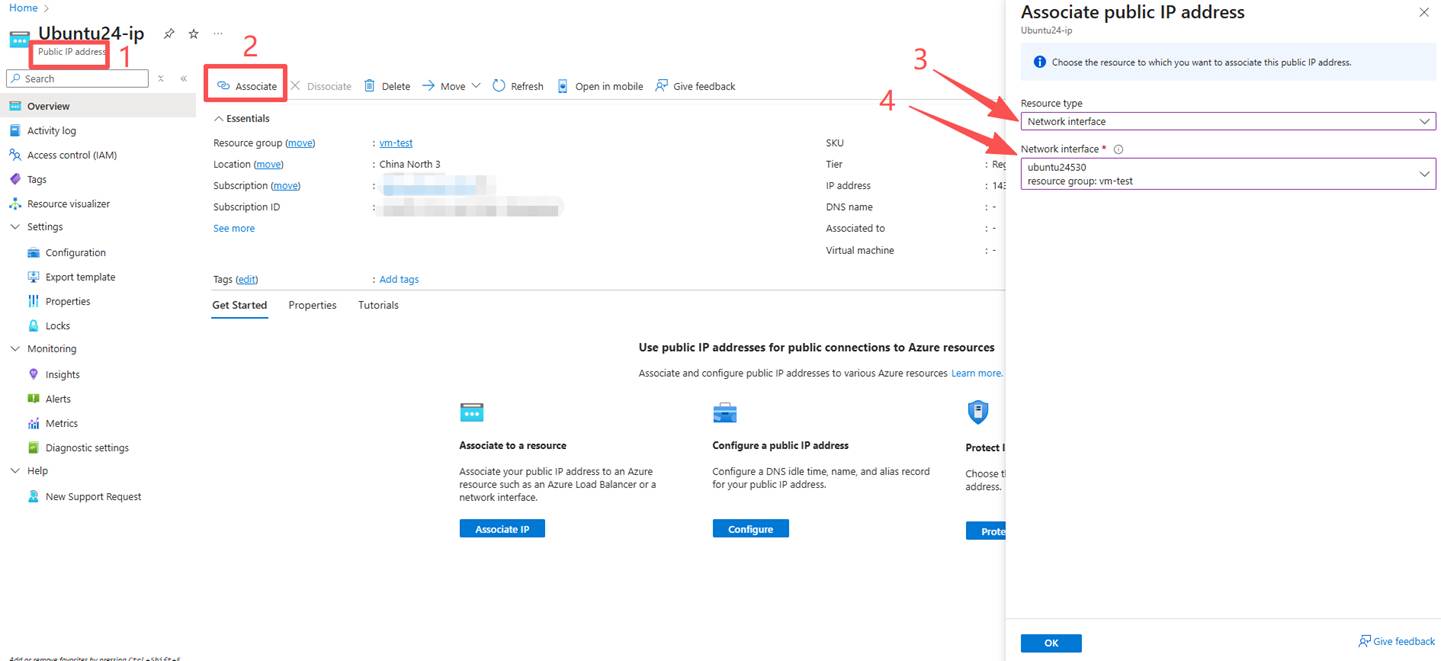
3. Unbind the NIC and upgrade it. After the upgrade, turn off the network card type and find the corresponding network card. (Upgrading the basic public IP is almost instantaneous.)
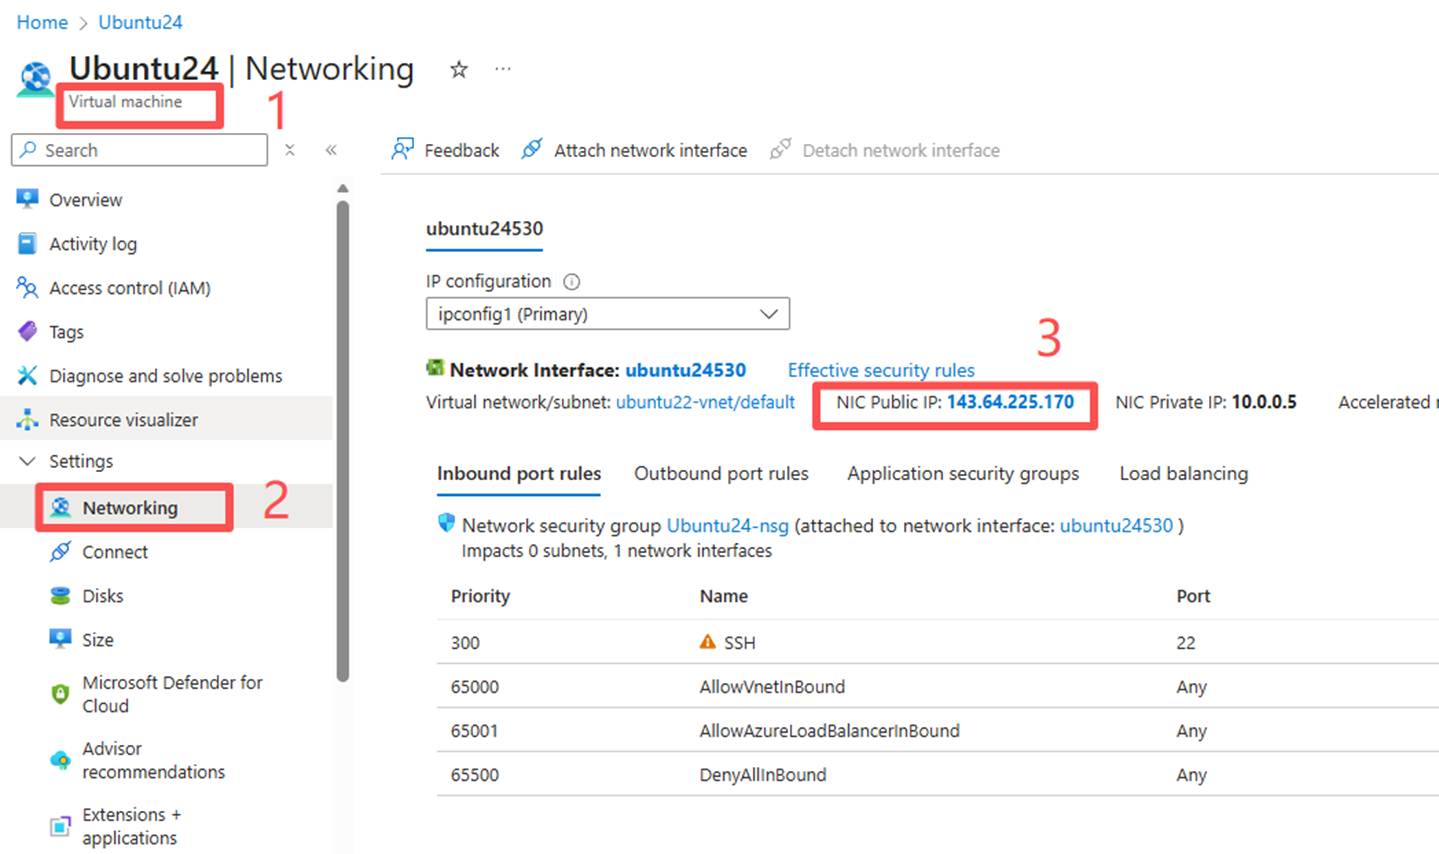
4. Upgrade public IP:Upgrade a public IP address | Microsoft Learn
5. After the upgrade is completed, connect the network interface.
Common Errors
The basic public IP that needs to be upgraded must be assigned statically. If an attempt is made to upgrade a dynamically assigned IP address, a warning will be received indicating that the IP cannot be upgraded. Before the upgrade, the IP address allocation should be changed to static. The standard SKU public IP addresses do not support dynamic IP allocation. Currently, there are no other alternatives except for static allocation.
Upgrade the public IP of the instances in VMSS Flexible from Basic to Standard
Pre-upgrade status
In VMSS Flexible, it is seen that there is no associated public IP at the VMSS level:
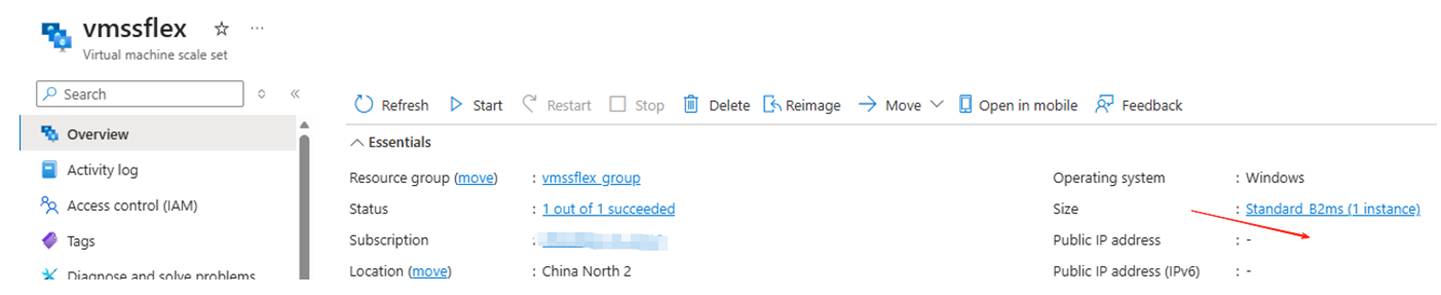
Upgrade steps
- Find the VMSS instance:

- VMSS instances have independent public IP addresses, which are associated with the Basic public IP:

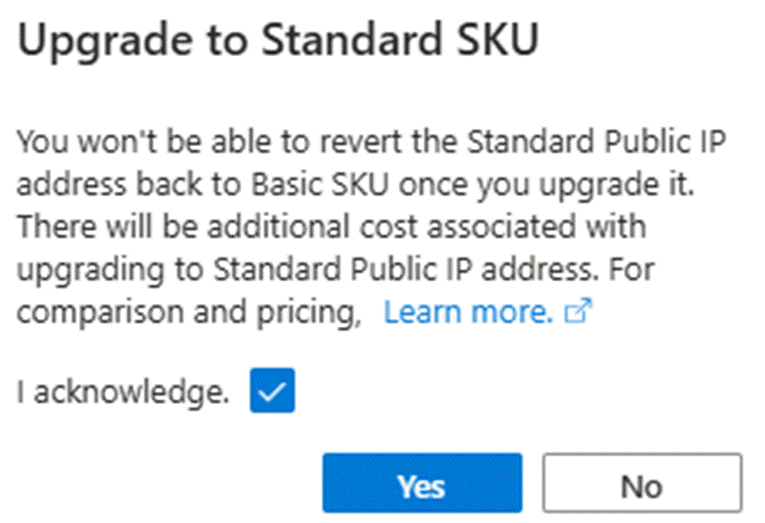
- Click on the blue font to upgrade to Standard SKU:
- After the upgrade is completed, re-associate the network interface:
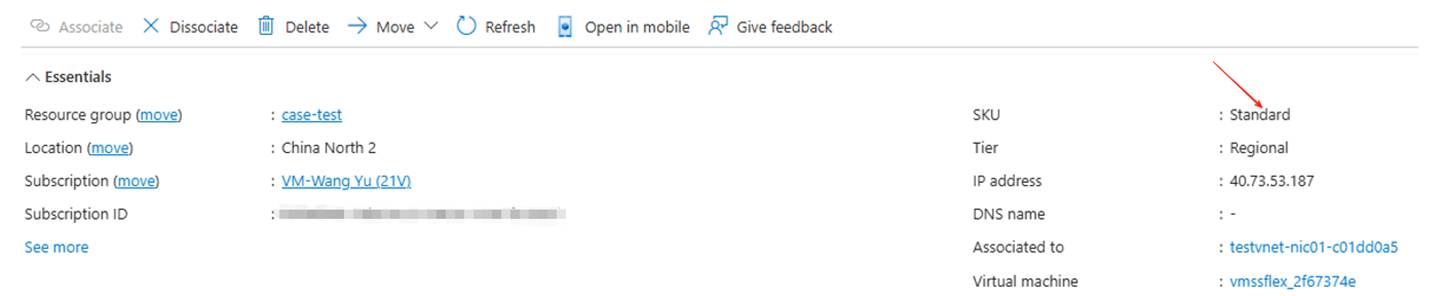
- The upgrade is complete. Check that the public IP SKU has been changed to Standard.