Linux 操作系统下使用 StrongSwan 搭建到 Azure 的 点到站点 VPN
在 Linux 操作系统下,可以使用开源的 StrongSwan 搭建到 Azure 的点到站点 VPN。
在众多的 Linux 开源操作系统版本中,我们仅选择 Ubuntu、Suse 及 Centos 的某些版本为示例,向您展示 StrongSwan 配置 Azure Point to Site VPN 的操作过程。
本文的示例仅供参考,需要向您说明的是,鉴于 Linux 拥有众多的开源版本,每个版本的安装操作命令可能不尽相同,关于如何有针对性的在不同版本的 Linux 操作系统下搭建 StrongSwan,已经超出了 Azure 的技术支持范畴,如您的 Linux 版本不在本文档的示例范围,请您自行咨询 Linux 开源社区或相关论坛。
安装 StrongSwan 组件:
Ubuntu
Ubuntu 18.0 之后的系统可参考文档:安装 - Linux(strongSwan) 进行安装。
Ubuntu 17.0 以及之前的版本请参考以下步骤安装(以 Ubuntu 16.04 为例):
apt-get install strongswan-ikev2 strongswan-plugin-eap-tls libstrongswan-standard-plugins –ySuse
Suse Linux 请参考以下步骤安装(以 Suse 12 SP3 为例):
sudo zypper install openssl strongswan iputilsCentos
Centos6 系列或 7 系列版本的可以参考以下步骤安装(以 CentOS 7.4 为例):
yum install -y epel-release
yum install -y strongswan
生成自签名 CA 证书:
ipsec pki --gen --outform pem > caKey.pem
ipsec pki --self --in caKey.pem --dn "CN=Azure VPN CA" --ca --outform pem > caCert.pem
查看 CA 证书并将公钥证书上传到 Azure P2S VPN:
openssl x509 -in caCert.pem -outform der | base64 -w0 ; echo使用 CA 证书生成客户端证书:
export PASSWORD="password"
export USERNAME="vpnsuer1"
ipsec pki --gen --outform pem > "${USERNAME}Key.pem"
ipsec pki --pub --in "${USERNAME}Key.pem" | ipsec pki --issue --cacert caCert.pem --cakey caKey.pem --dn "CN=${USERNAME}" --san "${USERNAME}" --flag clientAuth --outform pem > "${USERNAME}Cert.pem"
根据生成的客户端私钥和公钥合成 p12 格式证书用于 VPN 客户端拨号。
openssl pkcs12 -in "${USERNAME}Cert.pem" -inkey "${USERNAME}Key.pem" -certfile caCert.pem -export -out "${USERNAME}.p12" -password "pass:${PASSWORD}"从 Azure Gw 上下载客户端文件:

安装 linux 上传下载工具:
apt install -y lrzsz使用
rz -y上传文件,保存为sz -y。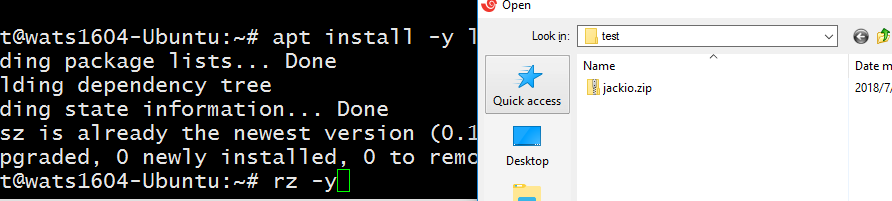
Suse Linux 请参考以下步骤安装(以 Suse Sp3 为例):
sudo zypper install lrzsz解压跟证书文件:
unzip -j jackio.zip Generic/VpnServerRoot.cer -d /etc/ipsec.d/cacerts验证根证书:
openssl x509 -inform der -in /etc/ipsec.d/cacerts/VpnServerRoot.cer -text -noout查看 Azure Gateway 拨入地址:
unzip -p jackio.zip Generic/VpnSettings.xml | grep VpnServer
拷贝之前生成的用户证书到相应目录:
cp vpnsuer1.p12 /etc/ipsec.d/private/修改
/etc/ipsec.conf添加配置:conn jackio keyexchange=ikev2 type=tunnel leftfirewall=yes left=%any leftauth=eap-tls leftid=%vpnsuer1 # use the DNS alternative name prefixed with the % right=azuregateway-9eb6b731-8052-47bf-94a5-1d27ded1e795-22825c716e49.chinacloudapp.cn # Azure VPN gateway address rightid=%azuregateway-9eb6b731-8052-47bf-94a5-1d27ded1e795-22825c716e49.chinacloudapp.cn # Azure VPN gateway address, prefixed with % rightsubnet=172.21.0.0/16 #Azure VNET address space leftsourceip=%config auto=add
修改预共享密钥配置文件,添加以下内容:
vi /etc/ipsec.secrets
: P12 vpnsuer1.p12 'password' # key filename inside /etc/ipsec.d/private directory
修改 MTU:
vi /etc/strongswan.d/charon/kernel-netlink.conf
重启服务并连接:
ipsec restart
ipsec up jackio
查看获取的 IP:
ip add list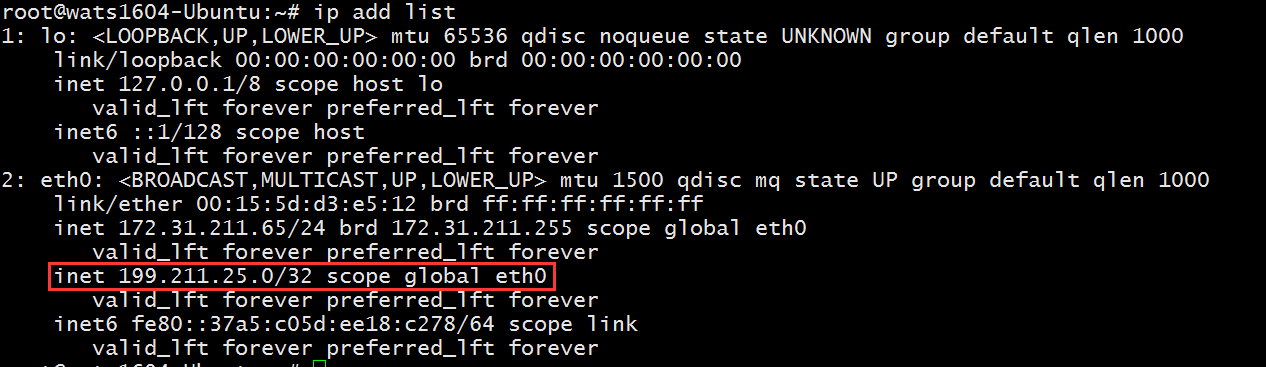
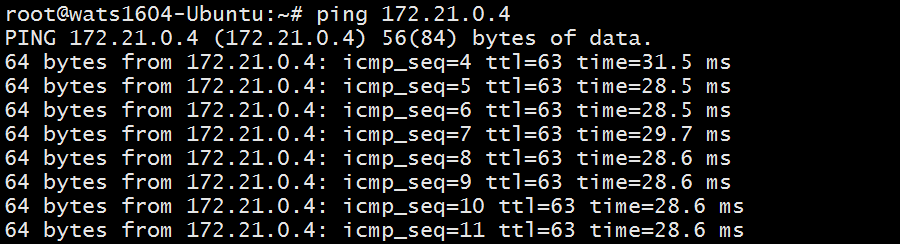
测试链接: